79.8%
7.74%
ParityǮ��V1.9.2
- ��Ȩ��ʽ�����
- �������ͣ�����Ӧ��
- ��������20.5MB
- �Ƽ��Ǽ���

- ������Դ������
- ����ʱ�䣺2022-10-30 05:12
- ���������
��Ϊ���رҵľ������֣�������2014��ļ��ܻ�����̫����Ethereum����ȫ���г��������£��ܼ�ֵ����280����Ԫ������ȫ��𱬵ı���ȫ����Ҳ����ͻ�ԣ�17��7����̫��Ǯ��Parity���ڿ�����ȡ��15.3����̫����Լ��3200����Ԫ��֮�����ٴα��ع���ڰ�ȫ©�������¼�ֵ������Ԫ����̫�������ᡣ�ڴ�֮��ParityǮ��������������
ԭ��̫������Ჿ�ֳ�Ա��������Ǯ��������ǿ��Ҳ��һ��
��ȫ�ȸߣ�����Ҫ����������������
������Ҫ��ߣ���Ҫ���ӽڵ���ܷ�����
һ��ParityǮ�����ذ�װ
֮ǰ�Ľ̳������ǽ�����MistǮ����MetaMask��myetherwalletǮ������ƪ�̳��У�����ϵͳ����һ��ParityǮ����ʹ�á�
ParityǮ�����ذ�װhttps://parity.io��
��ٷ���ʾ��
�ٷ������ǿ��������ְ�װ��ʽ����һ�֣�ֱ�����ذ�װ���ڶ��֣�Brew��װ�������֣�Docker��װ��
�����ǰ����У�����ͨ��Brew�����а�װ��
1��GettingHomebrew
/usr/bin/ruby-e"$(curl-fsSLhttps://raw.githubusercontent.com/Homebrew/install/master/install)"
2��AddingParitytoyourlistofHomebrew‘kegs’
���նˣ���������������enter��
brewtapparitytech/paritytech
3��InstallingParity
�ȶ���
brewinstallparity--stable
���°�
brewinstallparity
���¿�����
brewinstallparity--master
�������°汾
brewupdate&&brewupgradeparity
and
brewreinstallparity
4���鿴��װ�汾
liyuechun:~yuechunli$parity--version
Parity
versionParity/v1.8.2-beta-1b6588c-20171025/x86_64-macos/rustc1.21.0
Copyright2015,2016,2017ParityTechnologies(UK)Ltd
LicenseGPLv3+:GNUGPLversion3orlater.
Thisisfreesoftware:youarefreetochangeandredistributeit.
ThereisNOWARRANTY,totheextentpermittedbylaw.
ByWood/Paronyan/Kotewicz/Drwi?ga/Volf
Habermeier/Czaban/Greeff/Gotchac/Redmann
liyuechun:~yuechunli$
��������chainspec
PoAchain��Ҫ����һ���������顣
{
"name":"DemoPoA",
"engine":{
"authorityRound":{
"params":{
"stepDuration":"5",
"validators":{
"list":[
]
}}}},
"params":{
"gasLimitBoundDivisor":"0x0400",
"maximumExtraDataSize":"0x20",
"minGasLimit":"0x1388",
"networkID":"0x2323"
},
"genesis":{
"seal":{
"authorityRound":{
"step":"0x0",
"signature":"0x0000000000000000000000000000000000000000000000000000000000000000000000000000000000000000000000000000000000000000000000000000000000"
}},
"difficulty":"0x20000",
"gasLimit":"0x5B8D80"
},
"accounts":{
"0x0000000000000000000000000000000000000001":{
"balance":"1",
"builtin":{
"name":"ecrecover",
"pricing":{
"linear":{
"base":3000,
"word":0
}}}},
"0x0000000000000000000000000000000000000002":{
"balance":"1",
"builtin":{
"name":"sha256",
"pricing":{
"linear":{
"base":60,
"word":12
}}}},
"0x0000000000000000000000000000000000000003":{
"balance":"1",
"builtin":{
"name":"ripemd160",
"pricing":{
"linear":{
"base":600,
"word":120
}}}},
"0x0000000000000000000000000000000000000004":{
"balance":"1",
"builtin":{
"name":"identity",
"pricing":{
"linear":{
"base":15,
"word":3
}}}}}}
stepDuration�趨��5�����һ�����顣
validators�趨Authority�ĵط���Ŀǰ�ȿ��������洴��account֮���ٻ������롣
��������ļ����浽�����һ���ļ��У�����Ϊdemo-spec.json��
�������������ڵ�
��������ƪ�����У�������ͬһ̨�������������ڵ㣬�����ǽ�����̫��˽������(2)–ͬһ̨����/��ͬ�������ж���ڵ�ʱ�������ͬһ̨�������������ڵ㣬��Ҫ��rpcport��port����Ϊ��ͬ��ֵ������ͻᷢ����ͻ��POAchain��Ҳ��һ������Ҫ��һЩ��������Ϊ��ͬ��ֵ��
-d��ָ���洢�������˺ŵ�Ŀ¼
--dport��ָ��
--jsonrpc-port������
ui-port��
����������ָ������Paritynode��
parity--chaindemo-spec.json-dparity0--port30300--ui-port8180--jsonrpc-port8540--jsonrpc-apisweb3,eth,net,personal,parity,parity_set,traces,rpc,parity_accounts
���˴�һ������ָ���⣬ParityҲ�ṩ��Ϊ����config�����趨��ʽ��ʹ��--config�������������ļ���
node0ʹ�����������ļ�node0.toml��
[parity]
chain="demo-spec.json"
base_path="parity0"
[network]
port=30300
[rpc]
port=8540
apis=["web3","eth","net","personal","parity","parity_set","traces","rpc","parity_accounts"]
[ui]
port=8180
[websockets]
port=8456
node1ʹ�����������ļ�node1.toml��
[parity]
chain="demo-spec.json"
base_path="parity1"
[network]
port=30301
[rpc]
port=8541
apis=["web3","eth","net","personal","parity","parity_set","traces","rpc","parity_accounts"]
[ui]
port=8181
[websockets]
port=8457
�ġ������˺�(Account)
�����ܹ���Ҫ���������˺ţ�����Authority��һ��user�˺š�
����ҳhttp://localhost:8180�����ղ��贴��һ���û��˺š�
����Authorityaccount��ʹ��Restore���ܣ�Ϊ��ʾ��һ���ԣ�����ʹ��node0����passphrase��
��ĿǰΪֹ�����Ѿ����node0���˺����á�
�����������node1���˺����á�
"validators":{
"list":[
"0x00F9B30838ca40c8A53c672840acbDec6fCDb180",
"0x00Bd138aBD70e2F00903268F3Db08f2D25677C9e"
]
}
�ٽ�useraccount����accounts���K��һЩbalance����������ʹ�á�
"0x0064B0999c0142eE99aB0ceC054BAb53fe0a3EcC":{
"balance":"10000000000000000000000"
}
��ɺ��demo-spec.json���£�
{
"name":"DemoPoA",
"engine":{
"authorityRound":{
"params":{
"stepDuration":"5",
"validators":{
"list":[
"0x00F9B30838ca40c8A53c672840acbDec6fCDb180",
"0x00Bd138aBD70e2F00903268F3Db08f2D25677C9e"
]
}}}},
"params":{
"gasLimitBoundDivisor":"0x0400",
"maximumExtraDataSize":"0x20",
"minGasLimit":"0x1388",
"networkID":"0x2323"
},
"genesis":{
"seal":{
"authorityRound":{
"step":"0x0",
"signature":"0x0000000000000000000000000000000000000000000000000000000000000000000000000000000000000000000000000000000000000000000000000000000000"
}},
"difficulty":"0x20000",
"gasLimit":"0x5B8D80"
},
"accounts":{
"0x0000000000000000000000000000000000000001":{
"balance":"1",
"builtin":{
"name":"ecrecover",
"pricing":{
"linear":{
"base":3000,
"word":0
}}}},
"0x0000000000000000000000000000000000000002":{
"balance":"1",
"builtin":{
"name":"sha256",
"pricing":{
"linear":{
"base":60,
"word":12
}}}},
"0x0000000000000000000000000000000000000003":{
"balance":"1",
"builtin":{
"name":"ripemd160",
"pricing":{
"linear":{
"base":600,
"word":120
}}}},
"0x0064B0999c0142eE99aB0ceC054BAb53fe0a3EcC":{
"balance":"10000000000000000000000"
},
"0x0000000000000000000000000000000000000004":{
"balance":"1",
"builtin":{
"name":"identity",
"pricing":{
"linear":{
"base":15,
"word":3
}}}}}}
�塢����Authoritynode
Ϊ������Authoritynode���������飬���DZ����趨�������block��signer���քe��node0��node1account��
1����һ��������һ��node.pwds�ļ���д��node0��node1��password���������£�
node0
node1
2���ڶ�������node0.toml�ļ��м���[account]��[mining]���ã����£�
[parity]
chain="demo-spec.json"
base_path="parity0"
[network]
port=30300
[rpc]
port=8540
apis=["web3","eth","net","personal","parity","parity_set","traces","rpc","parity_accounts"]
[ui]
port=8180
[account]
password=["node.pwds"]
[mining]
engine_signer="0x00Bd138aBD70e2F00903268F3Db08f2D25677C9e"
reseal_on_txs="none"
3������������node1.toml�ļ��м���[account]��[mining]���ã����£�
[parity]
chain="demo-spec.json"
base_path="parity1"
[network]
port=30301
[rpc]
port=8541
apis=["web3","eth","net","personal","parity","parity_set","traces","rpc","parity_accounts"]
[ui]
port=8181
[websockets]
port=8457
[account]
password=["node.pwds"]
[mining]
engine_signer="0x00F9B30838ca40c8A53c672840acbDec6fCDb180"
reseal_on_txs="none"
4�����IJ���Step4�քe��������node
parity--confignode0.toml
parity--confignode1.toml
�������������ڵ�
ʹ��Postman��JSONRPC�����ԡ�
1����һ����Post����JSON������http://localhost:8540��ȡ��node0��enode����
{
"jsonrpc":"2.0",
"method":"parity_enode",
"params":[],
"id":0
}
��ȡ�����������£�
{
"jsonrpc":"2.0",
"result":"enode://cfb3af513da3a7a8138450f0dc01fa38cb2ac837744dc645038940287f4dce3f416f0e7e17fd10619a263c360d9324fd2dcd8753c4500fcc54cf84e076b39cd6@192.168.10.101:30300",
"id":0
}
"enode://cfb3af513da3a7a8138450f0dc01fa38cb2ac837744dc645038940287f4dce3f416f0e7e17fd10619a263c360d9324fd2dcd8753c4500fcc54cf84e076b39cd6@192.168.10.101:30300"��node0�ı�ʶ����һ�������ǽ��������뵽node1����ʵ�������ڵ�֮������ӡ�
2���ڶ�������node0��enode����node1��Post����JSONs������node1(http://localhost:8541)
{
"jsonrpc":"2.0",
"method":"parity_addReservedPeer",
"params":["enode://cfb3af513da3a7a8138450f0dc01fa38cb2ac837744dc645038940287f4dce3f416f0e7e17fd10619a263c360d9324fd2dcd8753c4500fcc54cf84e076b39cd6@192.168.10.101:30300"],
"id":0
}
���ص��������£�resultΪtrue��˵�����ӳɹ���
{
"jsonrpc":"2.0",
"result":true,
"id":0
}
���л���node1���նˣ��ῴ����������ݣ�
1/25peers13KiBchain11KiBdb0bytesqueue10KiBsyncRPC:0conn,0req/s,24µs
�ߡ����ͽ���
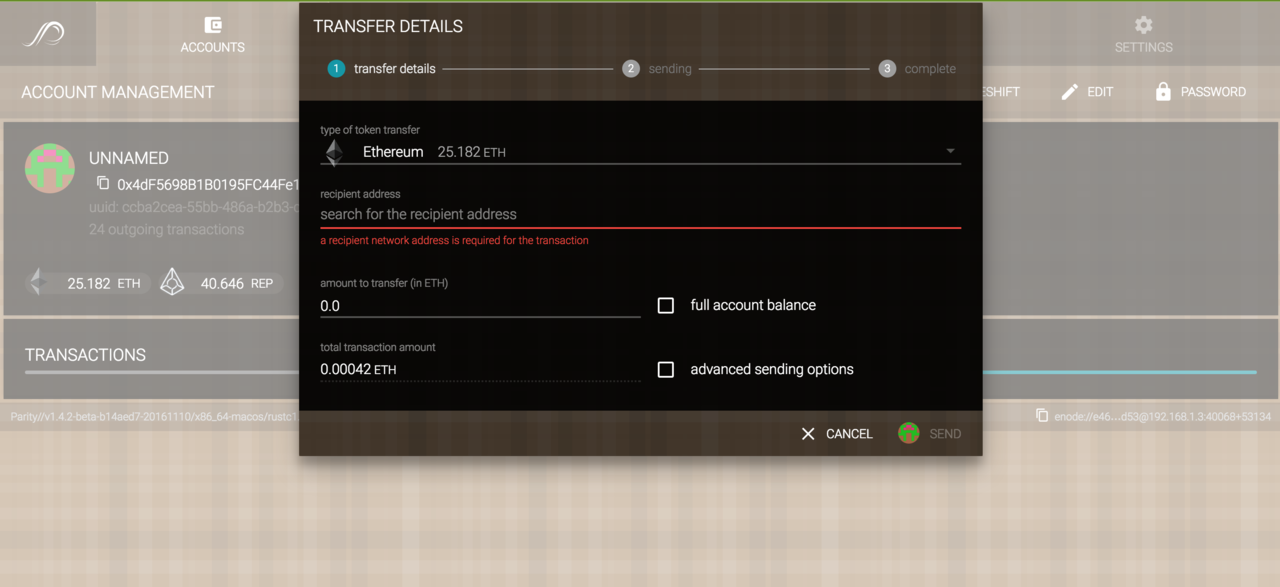
��������������У�����һ�������������˺ţ�һ���û��˺ţ�����POA�˺ţ��տ�ʼ��ʱ������Ϊ�û��˺ų�ʼ����10000ETH������ͼ��ʾ���˺����˺�֮������ת�ˡ�
�ˡ������������ڵ�
�ڿ���ʱͨ���Ὣnode����server�ϣ��������˿���ͨ��JSONRPCport������ȥʹ�ã���ʱֻҪ��config�ļ��������[interface]���ü��ɡ�
����serveripΪ192.168.1.5����node0.toml�����£�
[parity]
chain="demo-spec.json"
base_path="parity0"
[network]
port=30300
[rpc]
port=8540
apis=["web3","eth","net","personal","parity","parity_set","traces","rpc","parity_accounts"]
interface="192.168.1.5"
[ui]
port=8180
[account]
password=["node.pwds"]
[mining]
engine_signer="0x00Bd138aBD70e2F00903268F3Db08f2D25677C9e"
reseal_on_txs="none"
node1.toml�����£�
[parity]
chain="demo-spec.json"
base_path="parity1"
[network]
port=30301
[rpc]
port=8541
apis=["web3","eth","net","personal","parity","parity_set","traces","rpc","parity_accounts"]
interface="192.168.1.5"
[ui]
port=8181
[websockets]
port=8457
[account]
password=["node.pwds"]
[mining]
engine_signer="0x00F9B30838ca40c8A53c672840acbDec6fCDb180"
reseal_on_txs="none"
 �����49.5M
 ������Ƹ31.01M
 ���˶�����31.2M
 �ͿͰ�4.5M
 ����Ԥ������ͨ27.6M
 ��˯29.4M
 ����ָ����19.9M
 ��������29.9M
 ��������app6.7M
 ��������99.3M
 360�ֻ�����app27.8M
 �������赸168.9M
��������| ��ϵ����| ��վ��ͼ| ��ICP��2022005541��-1| ���ض���
xiaohei.com. All Rights Reserved .
С����Ϸ�ṩ�����������ļ���Ϊ�û������ϴ������繲����Դ��С����Ϸ���ṩ������Դ����,���������ַ����İ�Ȩ���������棬�������������Ȩ���ߡ�


 ����ͣ��
 ������
 ҽ������
 �ǻ�����
 �ǻ�ˮ��
 ʢ��ͨ�°�
 ��ͼ��ʦ
 �����ձ�